We first saw the prototype of this great Minecraft inspired coffee table when Martin Raynsford was in the office visiting. We were so taken with it that we arranged for Martin to take the material he needed so he could get to work on a full size version. Now that table is finished, we managed to get hold of Martin to give us the run down of exactly how it was made. Without further ado, over to Martin.

Hi guys. This is my contour based Minecraft(esque) map, and how it came about. The same process could be used with real world contour data or actual Minecraft maps for similar effects.
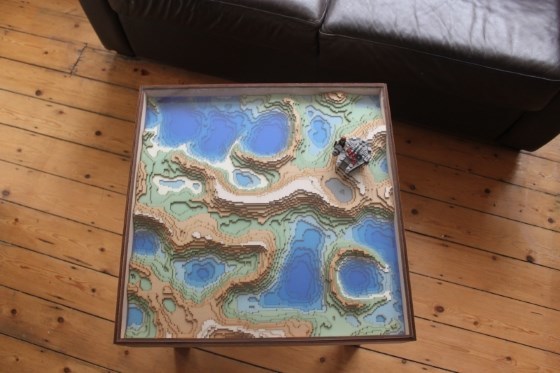
A long time ago I made a small sample of a landscape using transparent blue perspex to form the water layers. The blue colour adds up as you go down through the layers so the deepest areas appear to be a darker blue than the surface, just like real water. I promised to make a full coffee table sized version and with some help from Kitronik I was able to put this map together really quickly.

The map layers are made from 3mm MDF, the water from 3mm Fluorescent Blue Perspex, the top surface from 5mm clear Perspex and the sides from 6mm Birch Plywood. The landscape was built upon an Ikea LACK side table. The final item is incredible and every time I look at the landscape I see something new in the details that I forgotten about. This will be my favourite piece for a long time to come. Check out all my other items at MSraynsford.blogspot.co.uk.
Making the model
The first step was to make a 3D Terrain Model. I said this landscape was Minecraftesque, and originally I wanted to create an actual Minecraft landscape but I suffer from horrible motion sickness so I had to build a terrain from scratch.
I chose to use Cinema 4D to create my terrain, there is a primitive terrain shape which lets you specify a seed value, chose how rough/smooth you want your hills and a whole bunch of other settings. I’ve used Cinema 4D for a while and it is possible to get a demo version of the program so it was quicker for me to go with what I knew. This allowed me to create a 3D model and export it with an STL format.

It is possible to export actual Minecraft maps to an STL format and it is even possible to create a 3D model using ordnance survey maps so you could replicate a real world place. From this point on I’ll assume you have a 3D map the X Y and Z size you want and in an STL format.
Slicing the 3D Model
The map needs to sliced into layers for reassembly once cut. There are 2 main programs I found for slicing:
123D make. This is the most common slicer for Laser cutting. It allows you to set up materials, size and thickness and it labels each part to make them easier for stacking. The problem is when it ‘optimises’ the cutting. In this model we’re interested in the void space as well as the material space because the void spaces get cut out to form the water layers. 123D shuffles all the parts together where possible and allows minimal editing afterwards (I’m mentioning the reasons not to use it in the hope that someone might make it an option in future versions).
Slic3r. Slic3r is primarily a tool for 3D printers, but what we’re trying to achieve here is very similar to 3D printing, it’s a series of layers stacked up to create a relief map. Slic3r has a very handy function that allows you to export the slices to svg which makes it very easy to edit after slicing. Because it’s important to keep the 3D printed layers on top of each other, the output vectors are all stacked appropriately preserving all the void spaces.

Slic3r was the way to go for this project. The trick to using slic3r was to create an imaginary 3D printer with the appropriate build volume and tell it that it has a nozzle diameter and layer thickness equivalent to the material thickness. This allows slic3r to create a model with 3mm layers, a sizeable step for a 3D printer but perfectly normal for a laser.
Preparing the Vector Artwork
The output from Slic3r is a series of stacked vector lines, one for each layer of the model. These are unlabelled so some care should be take to identify each layer, this isn’t too difficult because as you go up the mountains there are fewer and fewer parts. I spaced out all 15 layers from bottom on the left to top on the right.
Minecraftifying the map
I started with curved contour data so I had to square it all off to create that inimitable Minecraft effect. This was achieved simply by exporting each layer to a bitmap image with the appropriate number of pixels (180 in this case). Inkscape decides which pixels should be black or white. The low resolution bitmap images were then imported back into inkscape and ‘traced’ to return them to vector artwork, but this time the contours were squared and blocky because of the low resolution.

To help stack the layers up once they have been cut it is sensible to draw an outline on the layer below. Each layer was copied and place upon the layer below, the original lines were coloured red to indicate cut lines and the outlines were coloured blue for low power cuts. This artwork was saved as dxf and sent to the laser cutter for cutting.
The bottom 5 layers were inverted and traced again, the vector artwork for this became the water layers and were eventually cut in Perspex to create the water effect.
Cutting a Prototype
With any large project it’s worth cutting a prototype to prove it’s going to work. This map was 550x550mm and 3mm MDF and that’s a lot of material to use if something is wrong. The prototype was a scaled down version of the map, 225x225mm and using 1.5mm mdf, I was able to cut 6 layers on the same sheet of material.

I learnt quite a lot from this attempt.
- The material was originally plain but it was hard to take in detail so I went through and painted it once assembled, this was time consuming and dull so in the final map all the sheets were coloured before cutting.
- The colours were very bold/strong, so while they were important they were dulled down in the final model.
- Only the top 5 layers, where the mountains get quite separated had construction lines on the layer below. They were incredibly useful so I put construction lines on all the layers.
- I didn’t like the sand bar across the lagoon so I removed it from the next build, replacing the gap with water instead.
- Single pixels had a tendency to fall out of the laser cutter and were hard to align on the map, all single pixels were removed from the final build.
Full Sized Construction
With the changes made to the prototype it was time to progress to the full sized model. Whole sheets of material were painted in appropriate colours.

The bottom layers needed to be painted sand coloured this time because the blue colouring comes from the water layers placed on top of them. A few beaches were also added to the first grass layer.

Each layer had alignment guides for the layer above so assembly was a lot faster than before.

In discussions I’ve had since the table was made someone pointed out that it is actually possible to make the whole thing from just 2 sheets. All the layers can nest inside each other, the layer above is always smaller than the layer below (unless you have rocky outcrops). If you nest all the odd layers and all the even layers you have enough overlap to stick all the layers together. Standard wood glue was used to hold the parts together.

Adding the Water Layers
To complete the map the water layers are added to the hollows. These parts were all cut at once and shuffled into the available spaces on the sheet. This meant it became a giant jigsaw of blue pieces. With a little bit of patience all the parts found their homes and the map came together. Some of the edge pieces were able to slip out of the map so once they were all in place I ran round the edge with a clear piece of sticky tape.


Ikea Lack Donor Base
The landscape was built to be the same size as an Ikea Lack Side table. This is a quick way to turn it into a functional piece of furniture. The map was boxed in on all 4 sides with 2 layers of 6mm Birch plywood, the inner layer was built to be slightly lower than the outer and to line up with the top layer of the map, this allowed a 5mm sheet of clear perspex to be dropped in on top of the map and become a flat surface for the table.

The sides were glued to the coffee table but the map was just dropped in to place, this allows me to move the map again in the future. If I were to do this again I would arrange it so that the whole top frame just dropped onto the coffee table. The table becomes quite heavy once loaded and it would be nice to separate all the parts out again if desired.
I hope you’ve enjoyed reading about the build as much as I did making it. If you try your own don’t forget to let us see pictures.
