With Halloween just around the corner, it’s time to get your costume ready! Become a superhero and create your own pulsing reactor to complete your Iron Man costume or wear underneath a t-shirt as Tony Stark.

Use the Zip Halo and Zip Circle together, along with the cad files provided to build this fun prop inspired by Iron Man’s Arc Reactor. You provide the sunglasses, chin stubble, and clothing and we’ll help you with the rest!
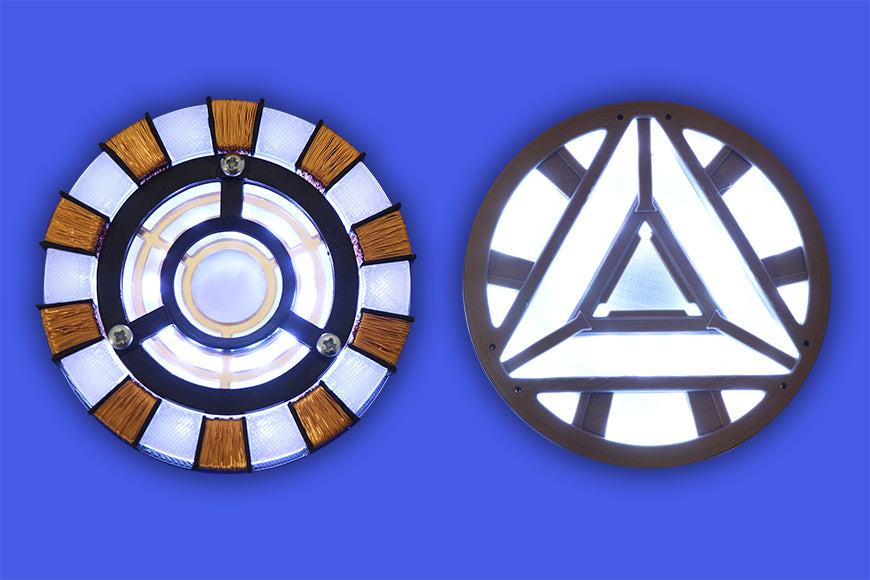
Choose between two different versions ready to 3D print and build – firstly, the Mk I, based on the original reactor in the first movie, or second, the Mk II, based on the new element reactor in the second movie.
Links & Files:
microbit Powered Halo-ween Ironman Arc Reactor:

Step 1

To begin building the Zip Halo Reactor you will need to connect your Zip Circle to the Zip Halo, and attach your microbit if you haven’t done already.
Joining a Zip Circle to the Zip Halo is very simple. Use three wires (approximately 100mm in length) and solder in the order shown.
| ZIP Circle. | ZIP Halo. |
|---|---|
| GND (Ground). | GND |
| Vsw (Power). | +5V. |
| DIN. | DOUT. |
Pass the Zip Circle through the gap above the microbit so it sits in front of the Halo (you may need to remove the microbit to do this).
Step 2
Before building the reactor, it is a good idea to test your Zip Circle and Halo. Try creating this code in the MakeCode Editor to give a pulsing effect.
Swap the variables around in the “pixels show colour” bar to swap between red green and blue. Adjust the “change White by” value to increase or decrease the speed of colour change. You may also need to change the value of 47, which in this case is 255-(8×26).
Step 3

Let’s begin creating the Mk I reactor. first, print part 1 using clear filament (I used Robox’s Crystal Clear ABS at 5% infill). This will have a frosted look which will diffuse the light nicely from the Zip Halo. You will need 10 copies of part 2, which can be printed in either black or grey/silver (I used Robox’s Black as Night ABS at 10% infill). These pieces should fit very tightly onto part 1 as shown.
Alternatively, if you would prefer not to use copper wire, print part 2.5 instead. This has the wires built into the part which could be painted after printing.
Note: Parts could instead be spray painted if you are limited on colours.
If you would prefer to build the Mk II reactor then skip to step 8.
Step 4

Continue by wrapping coils of copper wire around all 10 components. The wire can also be glued in place at the base. I used superglue, however, hot glue or contact adhesives would also do the job.
Note: For an additional detail you can solder on strips of wire in-between each coil as can be seen in the movie.
Step 5

Print parts 3 and 4 – if you have access to a laser cutter, part 4 can be cut using the .dxf file provided (I used Robox’s Black as Night ABS for part 3 at 10% infill and black Perspex for part 4). Fix the Zip Circle to part 4 using double-sided tape or a small amount of glue and continue to assemble the components in the order shown, using two M3x16mm screws.
Note: If using a strap to mount the reactor to your chest, thread the material through the slots in part 3 before screwing together.
Step 6

Print parts 5 and 6 – if you have access to a laser cutter, part 5 can be cut using the .dxf file provided (I used gold Mirrored Acrylic Sheet for part 5 and Robox’s Black as Night ABS at 10% infill for part 6). Join these using three M3x10mm screws, leaving a small gap in-between.
Note: alternatively part 5 could be spray painted gold if you are limited on colours.
Step 7

Slot the assembled parts together – line up the holes in the gold piece of the inner ring with the two screws in the reactor. This should press together and stay in place.
Note: A piece of white paper or tracing paper can be used in between to help diffuse the light from the Zip Circle.
Your Mk I Reactor is now complete. Attach the LiPo battery to the strap, plug in and you’re ready to go.

Finished Mk I Reactor.
Step 8

To create Mk II reactor, print part A using clear filament (I used Robox’s Crystal Clear ABS at 5% infill) and part B in grey/silver (I used Robox’s Designer Grey ABS at 10% infill). Alternatively, part B can be laser cut using the .dxf file provided. Join the parts using six M2x6mm screws as shown.
Step 9

Print parts C and D. If you have access to a laser cutter, part D can be cut using the .dxf file provided. (I used Robox’s Black as Night ABS for part C at 10% infill and black Perspex for part D). Fix the Zip Circle to part D using double-sided tape, or a small amount of glue, and continue to assemble the components in the order shown. Then fix it together using two M3x12mm screws.
Note: If using a strap to mount the reactor to your chest, thread the material through the slots in part C before screwing together.
Finally, your Mk II Reactor is now complete. Then, attach the LiPo battery to the strap, plug in and you’re ready to go.

Finished Mk II Reactor.