
This Kitronik University MakeCode Editor Resource is a part of the BBC micro:bit partnership and is a basic guide for getting started with Microsoft MakeCode Editor.
![]()
Getting Started with Microsoft MakeCode Editor for the BBC micro:bit:
The Microsoft MakeCode Editor is a drag and drop editor for the BBC microbit that provides a simple introduction to programming. Blocks snap together to build programs and are grouped by the type of function they do. When a group is selected, the commands in the whole group are highlighted and can be selected. It’s a great introduction to programming for those with little or no experience.
The MakeCode editor was formerly known as the PXT editor and was developed as a replacement for the original block editor. The new editor has many more blocks than the original editor, which enables you to more fully take advantage of the microbits capabilities.
If you are still using the original block editor, we would urge you to make the switch as it is much better in every way, and, works as the original block editor did.
Course contents:
- Selecting blocks.
- Saving, Downloading And Sharing.
- Deleting blocks.
- Searching For Code Blocks.
- The Simulator.
Selecting Blocks:

1. Select a block category from the list on the left-hand side of the page.
2. Select a block from the selected category, then drag it to the workspace area on the right.
3. Snap new blocks onto existing blocks in the workspace area. As the new blocks are dragged into the workspace, the editor highlights the connecting parts of each block when they are in a valid position to snap to existing blocks. Also, the shape of the blocks gives you an indication of where they might fit into your code blocks.
Saving, Downloading And Sharing:

Saving:
Your code is automatically saved as you work. You can access your saved work by clicking on the micro:bit logo shown above. To make your projects easier to find, it is always good practice to name your project in the space provided at the foot of the editor.
Downloading:
In order to get your code onto a micro:bit, you must first download it. Towards the bottom left of the editor is a large download button, when you click this button the code in your workspace will be compiled as a HEX file and then downloaded to your computers default download folder.
Sharing:
The Share Icon in the top left of the editor takes you to all of the available sharing options. Upon clicking this icon you code will first be published to the cloud. You can either share with a link or embed the editor into a webpage, using their generated code snippets.
To see the embed options click on Embed and you will be able to choose from; Screenshot, Editor, Simulator, and Command line. Copy the code and insert into your web pages HTML. Experiment and see which option works for you. In the example above we chose the Editor option, which allows you to download the code, view the Javascript, and open the code in the actual editor. You can even use the simulator in the same way as you can with the actual editor.
Connect your microbit to your computer via USB and the microbit will show up as a removable drive. You can then drag HEX files from your downloads folder and drop them directly onto your microbit. You will notice that during file transfer, the orange light on the rear of the microbit will begin to blink, once the transfer is complete the light will stop blinking and the program is ready to go.
How to Delete Blocks Using Microsoft Block Editor:
You can delete blocks in three ways:
1. Press the DELETE button on your computer.
2. Or select and drag the selected blocks into the ‘bin’ that appears as you drag a block towards the blocks menu.

3. Additionally, select the block and right-click on the selected blocks. A drop-down list will appear, then select the ‘Delete Block’ option.

Searching For Code Blocks:

As an alternative to hunting through the various block menus for a particular code block, you can also search by name. The search bar is located immediately above the Basic blocks menu, type in your search term and the editor will display the blocks it thinks most match your search query.
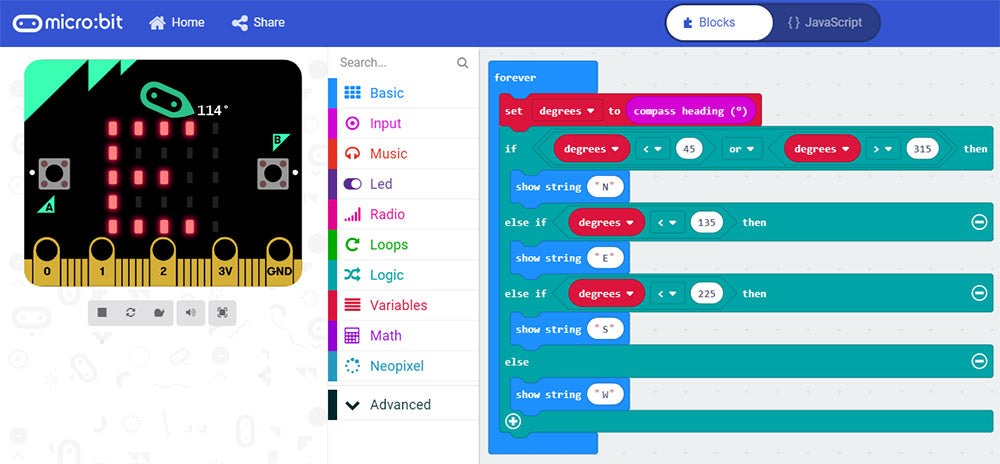
The Simulator:

One of the great features of the editor is that you can test your code before you download it to a microbit. The simulator behaves just like a physical microbit and it also enables appropriate parts of the microbit when certain code blocks are being used. As can be seen in the above image. The logo at the top of the microbit can be moved to simulate compass direction.