We have created some fantastic free :GAME ZIP 64 cases resources to make your gamer stand out. Use a 3D printer or laser cutter to make these great cases.  The LEDs used in the :GAME ZIP 64 for the BBC microbit are incredibly bright – we even use tinted Perspex in our test jigs. So, these cases and screen covers are designed to make them easier on the eyes.
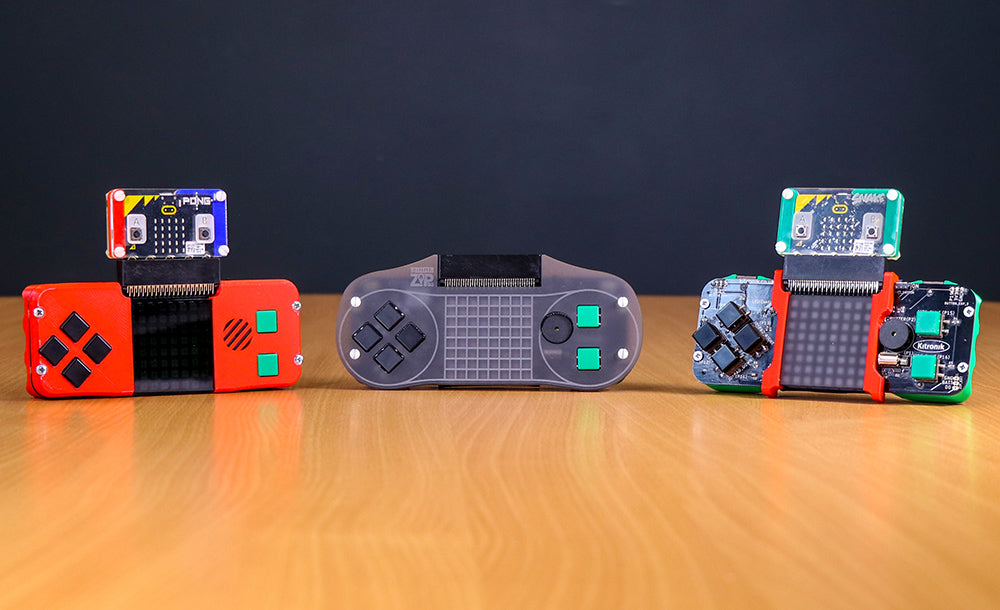
FREE :GAME ZIP 64 Cases – 3D Printed/Laser Cut:
I used Autodesk Fusion 360 to create a model of the :GAME ZIP 64 which I used to help design these resources. If you want to design and create your own, use the product datasheet or the .dxf files for accurate dimensions. My aim was to make these :GAME ZIP 64 cases really simple and easy to make and assemble. The DXF files can be downloaded from the links below or at the end of each of the three sections.
- Laser Cut Covers – Download our free DXF files here.
- Full 3D Printed Cases – Download our free DXF files here.
- 3D Printed Screen Covers – Download our free DXF files here.
Laser Cut Covers:
There are two laser cut :GAME ZIP 64 case resources which will require hardware to install. You will need 4 x M3x12mm screws, 4 x M3 nuts and 4 x M3x5mm spacers. You could also use a 6mm spacer or stack two M3 nuts. These fix the Perspex cover straight onto the ZIP 64 using the holes in the PCB. These cases are designed to be made from 3mm thick Perspex.  For these Perspex covers, I recommend using neutral transparent/frosted colours to avoid altering the appearance of the LED display. Using coloured Perspex may block out some of the colours making it harder to distinguish between different coloured LEDs. If you wish to use coloured Perspex, I recommend cutting holes for the LEDs to shine through. However, this will not dim the brightness at all. The .dxf files use three colours. The RED layer is for engraving which should be done first. On transparent Perspex, I found it best to engrave fast at low power. I engraved at 300 speed and 25 power. The GREEN layer is for internal cuts, which should come second before the BLACK layer which is the outer edge of the cover. These should cut all the way through your material. We recommend the following Perspex Sheet colours;
- Grey Perspex Sheet.
- Grey Frosted Perspex Sheet.
- Polar White Perspex Sheet.
- Blue Perspex Sheet.
- Glass Look Clear Perspex Sheet.
- Clear Perspex Sheet (Cast).

- Download our free DXF files here.
Full 3D Printed Cases:
These 3D printed resources are designed so that no hardware is required. This makes them easy to install, remove and swap. The front of the cases snap onto the ZIP 64 using the holes in the PCB and the grips on the rear just push fit on. NOTE: Tolerances vary from printer to printer and at different quality prints. You may need to file down the small pins which slot through the PCB.  The first case uses a small piece of 3mm transparent/frosted Perspex for the screen. Which, like the Perspex covers, must be neutral so that the colours of the LEDs are not affected. The rest of the case and the grips can be of any colour filament. NOTE: if you do not have access to a laser cutter, you can either cut the piece of Perspex by hand or use a neutral colour filament (white or grey) to create a screen to slot into this gap. For the light to pass through the plastic, print at two layers thick (for our printer this was 0.6mm).
  The second case covers the screen completely. This means it must be a neutral colour to let the light through without the colour being affected. I used grey filament which turned out great and the 64 holes for the screen really define the edges of the individual LEDs. If designing your own case for 3D printing, try out some different shapes!
- Download our free DXF files here.
3D Printed Screen Covers:
These screen covers are designed to snap straight onto the front of the ZIP 64.  The first cover uses a small square of Perspex like the first case, with two 3D printed pieces which fit on either side and fix to the PCB. Print these with the curved side laying on the print bed with support underneath to avoid snapping when clipping into place.
  The second cover is a single piece print. This should be printed in a neutral colour to let the light through without the colour being affected.
  To fix these in place, hook the bottom of the screen cover over the PCB first and push down until it snaps into place.
- Download our free DXF files here.
Try making one of these :GAME ZIP 64 cases or design your own! Share your work with #kitronikfun and get coding! If you don’t have access to a 3D printer or Laser Cutter, why not see if you have a Hackspace nearby?