Description
This is an ideal starter project that is quick and easy to make. The circuit is created on a backing fabric which is then attached to the inside of the hat.

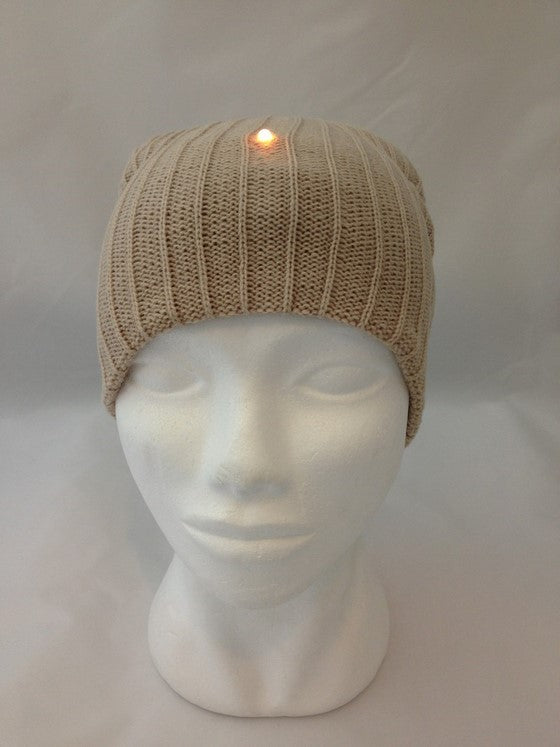
It uses a standard LED which is slightly harder to use than a PCB LED as you have to twist the legs before sewing them. They are a little more fiddly to use and identifying the positive and negative side of the LED is a little harder. They can be placed under the surface of fabric but as they have a small bulb at the end of the LED they won’t sit as flat as a PCB LED and they usually sit pushed through the surface of the fabric so the bulb can be seen. The bulb can act as an embellishment as it looks like an ordinary bead when the LED is not switched on.
As most fabrics fray you can’t usually just cut a hole to push the LED through so methods of neatening the hole need to be found. This hat design pushes the LED through the holes in the knit of the fabric.
Learn how to:
- Use conductive thread, a standard LED and switched cell holder.
- Make a basic e-textiles circuit.
- Place a standard LED on the outside of a product without having to cut a hole in the fabric.
Level of difficulty:
- Beginner.
Parts list

In order to add an LED to your beanie hat you will need the following:
- Knitted hat with lining. Both the main hat and lining fabric should have obvious holes in the knitted fabric when stretched as this will allow the LED to be poked through the fabric.
- Switched cell holder.
- Cell battery.
- Standard LED.
- 50cm conductive thread.
- Felt approximately 6x7cm.
- 50cm ordinary sewing thread.
You will also require the following equipment:
-
- Large eye e-textile needle.
- Scissors.
- Round nose pliers.
Step by Step guide to adding a standard LED to your beanie hat
Step 1

Identify the negative leg (the shorter of the two) and twist it into a loop using round nosed pliers.
Alternatively the negative leg can also be identified by the flat side along the rim of the bulb.

Push the loop so it sits at right angles to the bulb allowing it to sit flat on the fabric.
To avoid confusing the legs don’t twist the other leg until it is needed but you can bend it to one side out of the way if necessary.
Step 2

Oversew 6 to 8 stitches through both the negative hole on the cell holder and the fabric.
Pull the thread tight to ensure it is secure and a good electrical connection is made.

Sew running stitches through the fabric to take the thread to the LED position.
Don’t cut or join the thread.

Oversew 6 to 8 stitches through both the loop in the LED and & through the fabric.
Pull the thread tight to ensure it is secure and a good electrical connection is made.
Cut away any excess thread once you have finished sewing the LED in place.
Step 3

Twist the positive leg around round nose pliers to create a loop.
Position the loop so it sits flat on the fabric.

With a new piece of conductive thread oversew 6 to 8 stitches through both the positive side of the cell holder and through the fabric.

Sew running stitches through the fabric to take the thread to the positive side of the LED.
Use oversewing stitches to hold the LED in place.
Cut away any excess thread once you have finished sewing LED in place, take care not to let the positive and negative sides of the stitches touch each other.
Step 4

Slide the cell into the holder.
Hold the battery along its sides and place into the holder with the positive side up.

The circuit is lit up by sliding the switch on the cell holder into the ‘on’ position.
Step 5

Use your fingers to pull apart the loops in the knitted fabric and poke the LED through the holes from the back of the hat to the front.

From the outside it should look like the picture to the left.
Step 6

Use ordinary thread to oversew the felt onto the inside layer of the hat.
Make sure you only sew through the back layer of fabric and not through the front so that no stitches can be seen on the front.
Stitch the felt so you can still lift it up slightly to switch the LED on.
Download a pdf version of this page here ![]()
This tutorial was produced for Kitronik by Julie Boyd who is a specialist in e-textiles design.