
This guide has been designed to help Primary Teachers learn about the micro:bit and to help you deploy them into the classroom. We have a wealth of guides online already but in the interest of convenience, we've gathered the information together here. Please expand the sections below to learn more.
What is the BBC micro:bit

The BBC micro:bit is a pocket-sized computer that you can code, customise and control to bring your digital ideas and games to life. It's packed full of sensors, buttons, LEDs, and other features that can all be taken control of with code. All you need is some basic skills and as much imagination and creativity as you can summon up. The easy to use MakeCode blocks coding environment means you can code something simple in seconds. With just a couple of blocks you can get the micro:bit to do something that's exciting to younger students. The list below shows the onboard features at a glance;
Features:
- USB, Radio, serial, and Bluetooth connectivity.
- A Compass & Accelerometer.
- 2 x user-assignable buttons.
- A programmable 25 LED display.
- 25 pin notched edge connector.
- Onboard speaker.
- MEMs Microphone with LED indicator.
- Touch-sensitive logo.
- Light level/Temperature sensing.
- Built-in sleep/off mode allows the board to be powered-down.
- It can supply up to 200mA of current to external accessories.
- Power status LED and USB data transfer LED.
- Code it with MakeCode; Blocks, Javascript, or Python.
As well as being packed full of all of the above interesting features, the micro:bit also has an edge connector and built-in wireless connectivity. The edge connector allows you to connect the micro:bit to additional components and devices to vastly expand what is possible for the micro:bit. You can also connect wirelessly to other Bluetooth enabled devices, such as phones and tablets, and even directly to other micro:bits. If you wanted to, you could connect two micro:bits together to play games such as rock, paper, scissors that can also track scores and automatically declare a winner. You can also keep it simple and just have the micro:bit display things on its 25 LED display, such as; emoticons, names, simple graphics, and more!
The button below takes you to an old resource that predates the micro:bit becoming commercially available to buy and covers a little bit more about the early history of the micro:bit.
micro:bit in the Primary Classroom

The micro:bit has been around for a number of years now and feedback from teachers has shown that it encourages independent learning. It also gives pupils a strong sense of achievement. It and can inspire those who are not usually interested in computers to be creative with them. The length of time that the micro:bit has been around also means that there is a wealth of resources available. We have produced way more than a 100 free micro:bit guides and resources, and you can find more still on the MakeCode website. This means that there are probably already guides available for most things that we can think of doing. This makes coming up with ideas and planning lessons a much easier proposition.
The button below takes you to our list of accessories and free resources that we have highlighted as being suitable for the younger learner. It's not a complete list, more of a cherry pick, find out more;
Powering the micro:bit

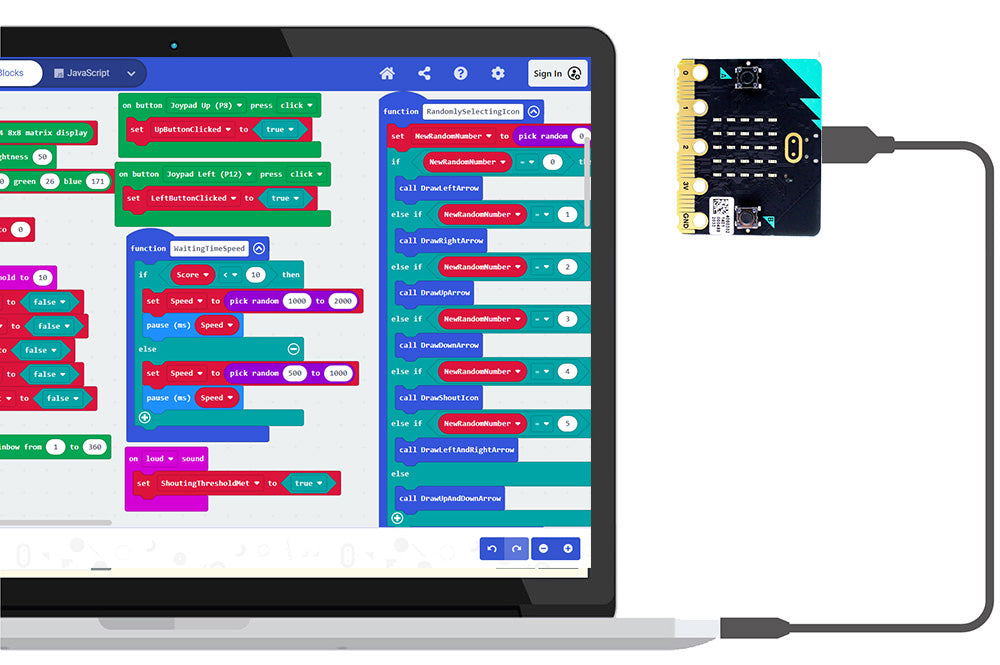
There are a number of ways in which you can power a micro:bit. In a classroom setting, the method shown in the image above is the easiest and most straightforward. When connected to a computer, via USB, the microbit will be supplied with the power it needs by the USB connection, the only additional equipment required for this is a USB Lead. The list below details other powering methods.
- Alternatively, you can go portable with a Battery Cage and AAA Batteries.
- It can also be powered via it's edge connector. The 3V and GND pins are marked and can be connected to with Crocodile Clips.
The button below will transport you to an old page we produced when the micro:bit V1 was first released, this micro:bit has since been superseded by the V2. Although it's an old resource, it does have useful images which show the above methods in action.
Connect the micro:bit to a computer
- Find a spare USB port on your computer and then plug in your USB cable. Then, connect the other end of the USB cable to the micro:bit.
- Once connected as above, the micro:bit behaves as if it is a removable drive.
- As such, it shows up in File Explorer (on windows, under Finder on a MAC) and it can have files dragged and dropped onto it.
- Unlike a removable drive, you cannot remove files from the micro:bit. The files are hidden from view.
- Loading a new program onto the micro:bit overwrites the last program that was loaded onto it.
The button below takes you to an old beginners guide document which has some additional information.
Intro to the MakeCode Blocks Editor

The Microsoft MakeCode Editor for the BBC micro:bit is a drag and drop editor that provides a simple introduction to programming. Blocks snap together to build programs and are grouped by the type of function they do. It's a great introduction to programming for those with little or no experience. Students often start here, learning essential coding concepts, before moving onto text based languages such as Javascript or Python.
Don't be fooled, MakeCode is a powerful language that you can use for some serious physical computing tasks, such as robotics, data gathering/crunching, and more. Programs can be as simple or as complex as your requirements need them to be.
The above gif image shows an animation of a simple program being built in the editor. Blocks are found and taken from the blocks menu, then the blocks are dragged into the work area where they are snapped to other blocks to form programs. The programs are them simulated on the shown micro:bit in the same way as on an actual micro:bit, so you can test your code before exporting it.
As with most things micro:bit, Kitronik has blogs for that! There are two buttons below, the one on the left takes you to a blog where you can learn more about the editor and there are some coding examples you can try. The button on the right focuses more on the simulator portion of the editor but it can also be used as an introduction to the editor. Working through the pages below will help you to become comfortable with the editor and writing programs, it will also introduce you to some core coding concepts such as variables.
Loading and running programs

Recent improvements to the editor means that getting a program to a micro:bit from a PC/Mac/Laptop is as easy as can be. As soon as you click on the purple download pop up windows tell you what to do and when to do it.
If a micro:bit is already connected to a USB port on a computer, the program can go straight to the micro:bit. Otherwise you can download it to a PC, then drag and drop the HEX file onto the micro:bit in File Explorer/Finder, where the micro:bit shows up as a removable drive.
As the HEX file transfers to the micro:bit the yellow LED on the back of the BBC microbit will flash. After a few seconds, the download will complete and the BBC microbit should now be running the program. If the LED doesn't flash during this process; you may need to press the 'reset/pwr' button which is located next to the Status LED on the back of the BBC microbit.
The downloaded program will now be available to run on the micro:bit whenever it is powered up and will stay there until another program is dropped on the micro:bit. The new program overwrites the old, keeping things all neat and tidy with nothing being required of the user.
Examples of code for the classroom
The following examples are all very simple programs that can serve as part of an introduction to programming for the younger student. More challenging code examples can be found in the table of links at the end of this guide.
Example 1: I love the micro:bit

The whole process of building the code is shown in the above animated image.
- Task 1 - Create the code shown above in MakeCode editor.
- Task 2 - Click on the Heart icon in the code and select a different image from the list.
- Task 3 - Recreate the original code but instead of a show icon block, use a show leds block and draw a smiley face by clicking in squares to highlight them.
Example 2: Mood badge

This code example illustrates how to use buttons and an onboard sensor. The buttons allow the user to chose their mood image, choose between button A - 'Yeah!' and button B - 'Meh!'. Status can be reset by shaking the micro:bit. The micro:bit can sense when it is moving and you can use that as user input in a program.
- In the Input menu find the on button A pressed block and drag two of them into the workspace.
- You'll notice that the second one you drag in is greyed out. If you click on the A and change it to a B, it is no longer greyed out.
- Get two of the show leds blocks, one in each of the button press block and then manually draw in the faces.
- In the Input menu find the on shake block and drag one into the workspace.
- Get the clear screen from the Basic menu and drop it into the on shake block
The code is now complete!
Example 3: Name badge
This example illustrates how to scroll text across the screen of the micro:bit. No user input is required, the text will continue to scroll for as long as the micro:bit is connected to a power source.
- Task 1: recreate the code as shown in the above image.
- Task 2: Adjust the code so that a button press displays the name and the other button displays another message, such as 'Hi'.
Once you've worked through the above examples, clicking the button below will take you to additional tutorials we've created for the micro:bit. These further illustrate what is possible with the micro:bit
Accessories for young learners aged 8+

We thought it would be useful to highlight how accessible learning is for the younger students. It might surprise you to learn that there is already a wealth of micro:bit accessories and free learning resources suitable for the younger students. Additionally, when creating new micro:bit accessories that require the use of the MakeCode blocks editor, we also create custom extensions designed to make coding accessible to younger learners and beginners. Details of the extensions are included either on product pages or in the learning materials provided with the product (often in the Datasheet).
Below we shine a spotlight on something that we designed specifically for use in Primary schools. It highlights what the product is and all of the resources that we produced to accompany it. We then provide a link to our 8+ category where you will find other examples of accessories that are suited for use with the younger learner.
Product Spotlight - Kitronik LAB:bit Educational Platform:
The Kitronik LAB:bit for the BBC microbit offers a super fun way for children to learn about coding in an engaging and hands-on way. It has been specifically designed for the classroom for KS2 computing and is backed by online MakeCode tutorials, simplified custom blocks, and a detailed getting started guide. Supplied in the box are; a battery holder (3 x AA), a wheel and tyre for the motor, and the detailed easy-to-follow guide.
It is absolutely packed with an impressive array of features and devices for easy delivery of fun and informative lessons. The resources we created specifically for the product are;
- 7 online MakeCode experiments that teach you how to create code for each area of the board, they are.
- Make your own switch.
- Making a Dice.
- Colouring a rainbow.
- Traffic lights.
- Controlling motor speed.
- Scare the micro:bit, using sound to drive LEDs.
- Parking sensor
- A Pirate ship for LAB:bit.
- Tech Talks - live stream playback.
The LAB:bit, as you can see, is well supported with resources. The LAB:bit is available as either a single pack or as a Lesson in a box Primary computing pack. The lesson in a box is supplied with a USB drive packed with teaching materials and lesson plans to help you deliver lessons all year, every year. Jump to the version that is right for your school via the buttons below;
Although we highlighted the LAB:bit, we also have another dozen products rated for learners aged 8+. Each of the accessories have detailed usage guides, and often additional resources designed for the user to get the most from the accessory. Some of these resources have been specifically designed for teachers to use in the classroom, and they can be be altered to suit your specific needs.
Next steps and places of interest
We hope that in going through this guide you now feel comfortable with the thought of using the micro:bit in the classroom. The table below contains links to more of our guides and also links to places outside of Kitronik that contain useful information. There are several years worth of collective wisdom out there, so the rabbit hole can be as deep or as shallow as you require.
©Kitronik Ltd – You may print this page & link to it, but must not copy the page or part thereof without Kitronik's prior written consent.


