We recently set Edward Bennigsen (the young digital maker at Make Things Do Stuff) a one week challenge to see what he could achieve with the
Laika Inventor's Kit. Over to Edward!

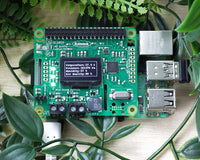
Into Raspberry Pi? Want to make some crazy hardware interfaces for it? The Laika Inventor kit by Kitronik is a great way to make your idea a reality. The kit comes with a bunch of electronic components like LEDs, motors, and potentiometers, but the most important item in the box is the Laika Explorer board by Eightdog. This a board that connects to your Raspberry Pi by USB and it is jam-packed with goodness. Four on-board buttons, two motor controllers, seven digital outputs, two analogue inputs, and 4 digital inputs. This allows a great many components to be wired up and utilised in your creations. The kit also includes a power supply for the Laika, a breadboard to plug your pieces into, and a nice acrylic plate which your Raspberry Pi and Laika Explorer plug into. Overall the kit is well-stocked and great to get you started with your Laika. Whilst it does have a separate power supply, the Laika Explorer is controlled entirely by your Raspberry Pi, unlike, say, an Arduino. Whilst this does mean you need both devices switched on and working for your hardware to work, it means your electronics have the full power of the Pi, including the Linux shell and an Internet connection, backing it up. This means you can very easily have button presses send tweets, LEDs display the current time in binary, or have a potentiometer dial control your speaker volume. It’s a lot of fun to just experiment and combine ideas and the Laika makes this really easy. You can control it using Scratch, Python, or C, so no matter what skill level you are or what you’re used to, you can have a crack at it and get something fun working. For example, with Scratch you could modify some of the main examples, like the chasing cat game, to be controlled by buttons on the Laika.
Having messed around with the board and the rest of the Inventor kit, I decided to set myself a challenge – what could I achieve with the board in just 7 days? What could I build in an average week? From the get-go, I wanted to do something that integrated with some external programs in Linux. Initially I was considering an alarm clock, but representing dates and times can be an unwelcoming and tricky process, so I decided to combine my Laika with one of my other passions: music. Whilst a crazy synthesizer/remix tool would be awesome, it was a bit beyond my means for such a short space of time. Instead I decided to make a custom MP3 controller so I could play my tunes and change track without having to mess with the keyboard. The Inventor Kit comes with a seven-segment display which lets you show numbers and letters on it, so I decided to use that to display the track number. Handily, the Laika board has four inbuilt buttons which I decided to use for play/pause and changing tracks. The Pi’s audio jack was used for my headphones and the Pi handled the MP3 player functionality using mplayer (more on that later). This is the great thing about the Laika: you can easily chain together components.
 I set up the seven-segment display using the tutorial on project-laika.com, although the display included in the kit was different so I had to look it up elsewhere to work out which pins controlled which segments. Once that was sorted, I followed a few of the tutorials on the website to understand how the Laika ticked and how to control it. I wrote a few little Python functions to write numbers to the display and to reset it. These weren’t that hard to do as you can turn the digital pins controlling the display on and off very easily. To play the MP3 files I used mplayer, which is easily installed on Raspberry Pi. This program can take a folder full of music and play through. It provides commands to play/pause, skip tracks, speed up playback, etc. Using the Python subprocess library, you can easily start mplayer whilst your Python script is running and pass it commands. Then it’s simply a case of waiting for input from the buttons and responding accordingly, like pausing the music. Whilst it took me longer than a week to make, this was because I had a friend round for the weekend and didn’t have chance to work on it. However, now I’m used to using the Laika I could do this much faster.
Overall, the Laika Explorer board is pretty powerful and a great way to do hardware with Raspberry Pi. Whilst the documentation does need improving a bit (it was a bit vague at times), it’s not that hard to work out what to do. The Inventor kit has a load of great components to get you started and the little board to hold the Pi and the Laika is handy and keeps your cables tidy. I’d definitely recommend the kit and I am looking forwards to doing more with it in the future.

©Kitronik Ltd – You may print this page & link to it, but must not copy the page or part thereof without Kitronik's prior written consent.
 I set up the seven-segment display using the tutorial on project-laika.com, although the display included in the kit was different so I had to look it up elsewhere to work out which pins controlled which segments. Once that was sorted, I followed a few of the tutorials on the website to understand how the Laika ticked and how to control it. I wrote a few little Python functions to write numbers to the display and to reset it. These weren’t that hard to do as you can turn the digital pins controlling the display on and off very easily. To play the MP3 files I used mplayer, which is easily installed on Raspberry Pi. This program can take a folder full of music and play through. It provides commands to play/pause, skip tracks, speed up playback, etc. Using the Python subprocess library, you can easily start mplayer whilst your Python script is running and pass it commands. Then it’s simply a case of waiting for input from the buttons and responding accordingly, like pausing the music. Whilst it took me longer than a week to make, this was because I had a friend round for the weekend and didn’t have chance to work on it. However, now I’m used to using the Laika I could do this much faster.


